Wednesday, December 21, 2011

Elegant Blue and Gold Lucky Stars

The blue stars and gold stars are very pretty on their own, but combining them leads to a stunning result.


The gold stars were placed in a circle around the bottom of the wineglass and then the blue stars were laid so two gold stars were between each of them.


The result reminds me of a snowflake! 


Really, the designs you could make with lucky stars are limitless.  You could put several rows of stars alternating colors to make a huge snowflake design for a grand centerpiece.


Of course, a simple circle of gold stars is just as elegant!


Elegant Lucky Stars in Blue Wineglass

These lucky stars are blue with gold streaks, coordinating perfectly with a blue stemmed wineglass and gold stars set around the bottom.


Although these stars could work for any occasion, the deep blue color reminds me of especially of the Christmas season.


Setting gold stars around the bottom of the wineglass really gives the setting an extra "pop"!


Elegant Lucky Stars in Gold Goblet

Lucky stars can be cute, but they are also very elegant when folded from metallic papers.


One of the most sophisticated ways to use lucky stars is to place them in a wineglass or a goblet.


You can use a plain wineglass or one that complements the stars.


This would be the perfect centerpiece for tables at a wedding or other elegant party.


If you scatter the stars around the table, they also take the form of a classy confetti that your guests will want to take home (talk about easy clean up!)


Gold stars would also be a great gift for a "golden anniversary."  Imagine giving your loved one 50 gold stars in a wineglass or maybe 500 in a vase!  The gift could be displayed for many more years to come and will be a continual reminder of your love.  You could also write one thing you love about the person on every single star and have your loved one read a new one each day.

Saturday, December 17, 2011

New Blog Layout

If you can't tell, I've redesigned my blog!  I felt the need for something a little "cleaner."  I changed the colors to black and white so that things would be easier to read, especially the links.  I hope the fun fonts show up, I really like them.   I also adjusted the width of my blog so I can use huge pictures.  Then, of course, there is the header...


Okay, I'm going to brag for a moment... isn't it beautiful????  Alright, bragging done.  But seriously, I really like this.  The blog is clean, and somewhat professional looking, but still has that little "pop" that is totally me!

The curvy design is a spirelli (you know, that string art you did as a kid).  I had already made it for a digital scrapbooking set and had never used it before!  I was thinking of using the spirelli I made to accent backgrounds, but I think inserting photos within them could make a really interesting (albeit difficult) scrapbook layout.

The hardest part of creating the header (after actually figuring out what I even wanted to do for my header and trying various photo-montages) was finding the right photos.  I have tons of photos, but not all of them look good in such small spaces.  I had to stretch some of them out... the stretch is somewhat noticeable to me, but what do you think?  If you had to pick, which are the ones that you think needed to be stretched?

After finding the right photos, it wasn't to hard to insert them.  A little bit finicky re-sizing them once they were placed in their slots but, overall, not to bad.

This probably isn't the last time I'll redesign my blog (I really, really enjoy it) but I think this template shall stick around for awhile.

Monday, December 12, 2011

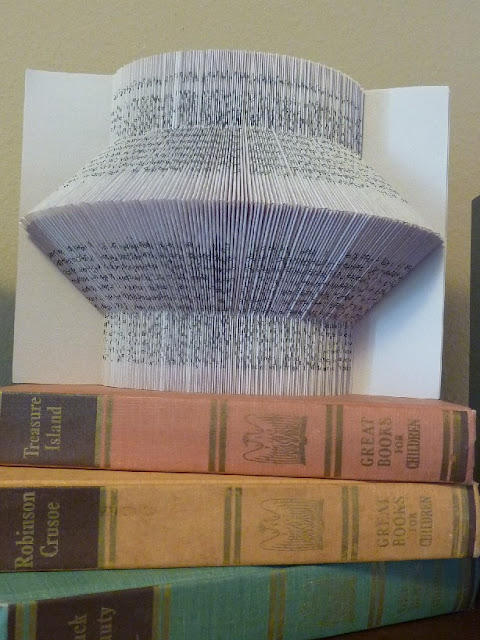
"Lantern" Book Folding Art

I'm at it again!  This time I decided to try a paperback book.  Take a look:


I found some really cool vintage-looking children's books along with a book rack at an estate sale this weekend.  "Well," I thought to myself, "I would feel terrible folding them... but I could definitely photograph them with folded books!"


There was a set of nine for $10 and the book rack was free (probably since I purchased all the books it held!)

Pin It
This folded paperback book is two books in one: "A Time to Forgive" and "Promise Forever" by Marta Perry.


Book folding can be placed as book ends by other books.  I would suggest using one of those slim black metal book ends if your books don't actually stand up on their own... you wouldn't want your folded creation to be crushed!  So far, I've only used metal book ends as a safety precaution since my books seem to stay standing on their own.


I really had a lot of fun setting up all these different designs!


I call this design "Lantern" because it reminds me of one of those paper lanterns you might hang up outside.  This one is made of paper too, but I don't think I'd risk putting it outside!


Thanks for reading... and looking!